Learning how to install a script is empowering. Back in 2009, I didn’t know what FTP was, let alone how to install a website script. I felt quite intimidated by the process. I did learn it, and so can you. Don’t be afraid to try as it’ll help you learn how to manage your site as well. The good news is, the SocialEngine PHP social networking script has an automated installer. All you really need to do is get it on the server, make a database and then go to your domain. We’ll show you how to do all of that below!
A few tips before we start:
- Have this tutorial open in one browser tab and open the linked tutorials in the steps below in another browser tab. That’ll make it much easier to follow along.
- Log into VestaCP in a different browser tab.
- Read each linked tutorial, and this one, first before you even start doing anything else.
- Pay very close attention to the folder on the server you are uploading the files to. That’s the biggest mistake that clients make. So, decide if you want your SE community in the public folder (yoursite.com) or in a subfolder (yoursite.com/community) or even in a subdomain (community.yoursite.com). Those are examples and if putting in a subdomain or subfolder, you can name them however you want.
- If using a subdomain or subfolder, make sure you are uploading the files in the right place.
- Make sure you’ve downloaded and unzipped the SocialEngine .zip file from your account at SocialEngine. Have this tutorial for Installing SocialEngine open in another tab.
Step One
Log into VestaCP and create a website if you haven’t done that already. You can create a subdomain if you decided to install in a subdomain. Make sure you point your nameservers once you have created the website.
Step Two
While still in VestaCP, create a database. You may want to name your database so you know what script it’s for in case you use other scripts. For example you could name it secomm. Remember to copy the username, database name and password for this as you’ll need it for the install steps.
Step Three
- Open your FTP program. Here are tutorials for Filezilla or WinSCP . This tutorial will show screenshots from Filezilla. If using WinSCP or other SCP programs, you could upload the zip file and unzip on the server. Log into your server via the FTP or SCP program.
- On the left will be the files on your computer. Be sure to navigate to the folder you have unzipped the SEPHP files.
- On the right will be your server once you’ve logged in via FTP.
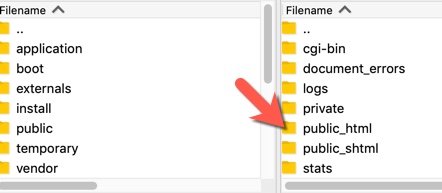
- You’ll need to navigate to the folder where you want to install SE. On the right, click to open your domain folder:

- Then, open the “public_html” folder. Before starting to upload, delete the robots.txt and index.html file from the public_html folder.
- If you want a subfolder, create it or if you made one already, open it if you want to install to that. Otherwise skip to the next step.
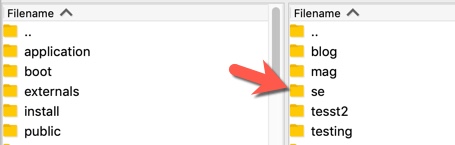
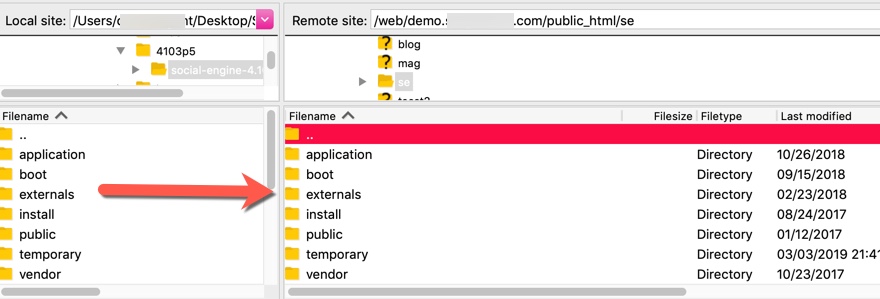
- Be sure to set Filezilla or your FTP program to show hidden files as there are some important hidden files such as .htaccess that must upload. Select all of the files on the left and drag them into the folder on the right. This will take a while as there are a lot of files. The screenshot below shows uploading to the /se subfolder.
Step Four
Once all of the files are uploaded, visit your domain in the browser. If you uploaded the files in a subdomain or subfolder, you’ll need to go there such as “subdomain”.yoursite.com or yoursite.com/”subfolder”. You’ll see the SocialEngine PHP installer. Enter your license key and follow the steps.
For FTP details, choose “None” as it’s the fastest method if you don’t know your FTP details which were e-mailed to you when you created your FTP user.
The database details will be localhost and then the database user, password and database name that you copied earlier.
Continue following the SocialEngine PHP install tutorial. Making a note of the admin email and password that you create as you’ll need it to log in once install is finished. Voila! It’s done!!
If you have any trouble installing, or want us to install it for you, feel free to contact our support and we’ll be happy to help.