This is the ninth article in our Making an Author Site with WordPress series. We’re almost done with this series and you should be well on your way to having your site done with some good content for your followers.
Unless you’ve got the most basic of basic WordPress websites, you’ve likely got a few plugins. They’re nifty little things that’ll help a website run smoother or look better or work in the way you need it to work. Plugins are an absolutely fabulous tool to help make a site go from good to great, but the fact remains that they need upkeep.
This is the eighth article in our Making an Author Site with WordPress series. We’re almost done with this series and you should be well on your way to having your site done.
Social share icons are simply exactly what they sound like — little buttons on a page that allow users to share content to other platforms. It’s a great little gadget that Jetpack helps you use and it’s easy enough to enable, too.
First, go to your Jetpack Dashboard. Next, in the top right of the screen you should see a “Settings” button. Click that and you’ll be taken to see all of Jetpack’s many features and settings you can change.
Near the top of the page once more you’ll find a long list of categories starting with “Performance” and ending with “Security”. Click the one labelled “Sharing”. Lastly, under the “sharing buttons” heading, enable “Add sharing buttons to your posts”.
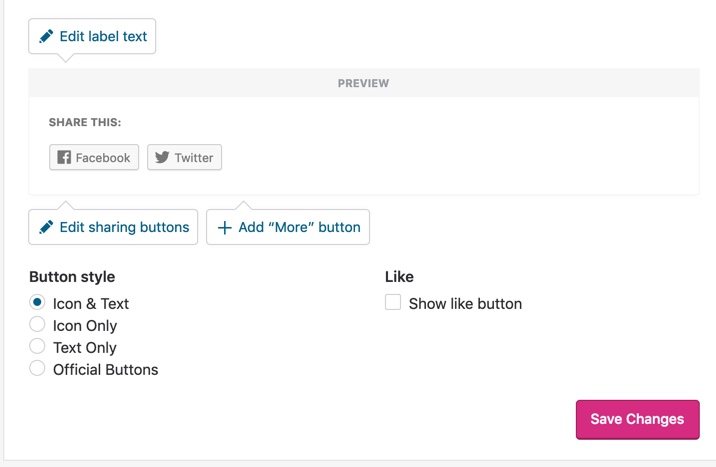
Bingo-Bango, you’ve got buttons. Well, you’ve got them enabled, anyway. There’s actually a few more steps to decide which buttons you want enabled!
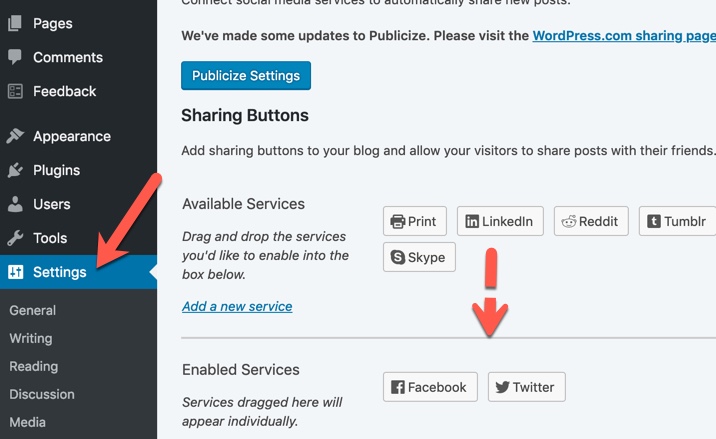
Get back to your main dashboard and now go to your WordPress Settings page on the left. Under it, click the Sharing tab. Simply drag and drop each sharing platform button you want enabled and you’re done!
Note that you can also change your button styles and where they’re located at the bottom of that section by going to the Jetpack Dashboard and clicking “Configure your sharing buttons”. You’ll be taking to WordPress and will need to log in. Once there, you can change the enabled buttons and how they look.
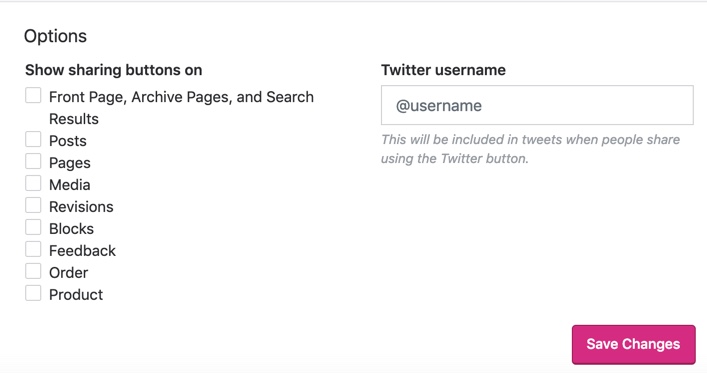
Below the customization options are options to choose which pages the buttons will appear on for your blog.
This is the seventh article in our Making an Author Site with WordPress series. If you already have your WordPress theme done, you can skip to the next section linked at the end of this article.
If you want to customize your Jetpack theme such as adding a logo or tagline, we’ll show you how below.
Where to Customize Your Theme
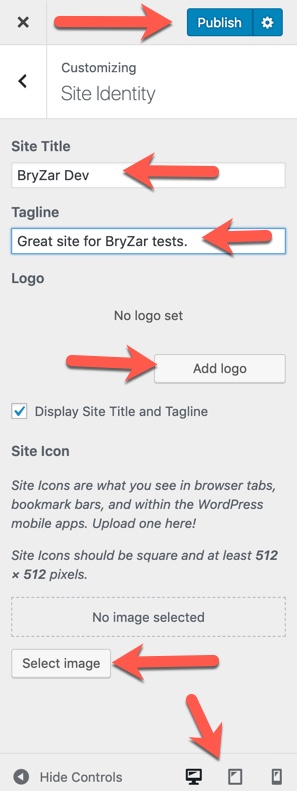
Navigate to Appearance > Customize to customize your theme.
How to Change the Logo, Tagline and Favicon
Once in the theme’s customization page, click “Site Identity”.
You can enter a Site Title and Tagline in the input boxes.
To upload a logo, click the “Add Logo” button and choose an image from your computer to upload or choose one from your Media Library.
To upload a favicon (the small icon appearing in the browser tab, bookmark bars and mobile apps) under “Site Icon” click the “Select Image” button and upload a 512 x 512 sized image.
At the bottom are icons to click to view your changes in different screen sizes. The preview will show to the right.
This is the sixth article in our Making an Author Site with WordPress series. If you already have WordPress menus done, you can skip to the next section linked at the end of this article.
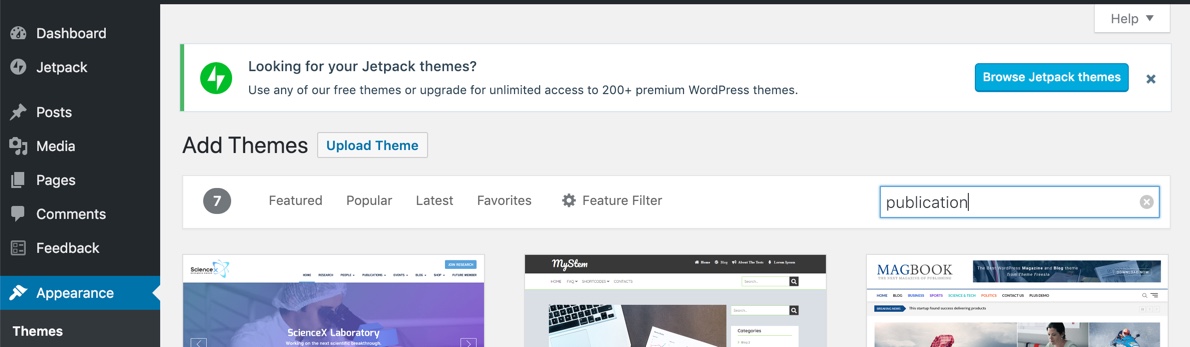
To access Jetpack themes, the first step is to go to your admin dashboard and on the left click “Appearance”. You should load onto the themes page automatically and, if Jetpack is activated properly, you’ll see a button at the very top saying “Browse Jetpack Themes”. Click it.
You’ll then be taken to WordPress’ theme page where you can search for themes. There are hundreds of different options so you’ll have a wide variety to choose from! The next step I would take is to choose whether I want a free theme or a paid theme. You’ll find that option near the top of the page.
There aren’t a lot of differences between free and paid themes. However, paid themes do tend to have better features, be more unique (most people go with free themes), have better support, and be more stable. That’s not to say that every free theme out there is overused or buggy, but there is a higher likelihood!
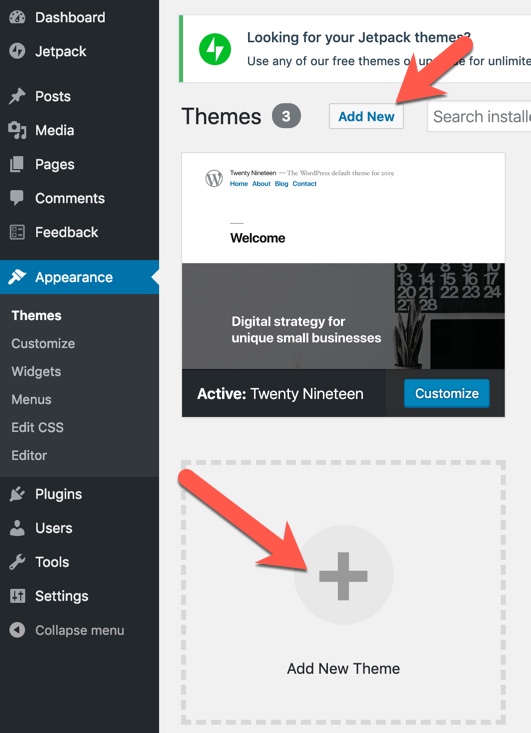
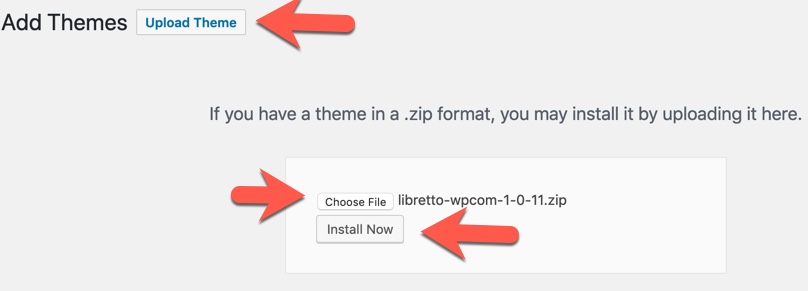
From there, simply pick a theme you like and download it! In the WordPress admin dashboard go back to the Appearance page where you started and click “Add New Theme” at the top or near the bottom.
Click “Upload Theme”, choose the file you just downloaded and click “Install Now”.
Finally, you can choose to either preview the theme or activate it. You can always come back to the Appearance section to activate the theme at a later date if you choose not to now!
This is the fifth article in our Making an Author Site with WordPress series. If you already have WordPress settings done, you can skip to the next section linked at the end of this article.
Install jetpack by going to Plugins > Add New It should show first in the list but if not, search for Jetpack. Click “Install Now”
After the install is finished, click Activate.
After reading the terms of service, choose to Set Up Jetpack or skip until later.
You’ll need to Set Up Jetpack if you want to use the features. Setting up Jetpack first involves connecting to wordpress.com so you’ll need your log in details for that. If you don’t have a wordpress.com account, you’ll need to make one.
You can either choose a paid plan or select to start with a free plan. After you’re done connecting to wordpress.com, you’ll be brought back to your WordPress admin.
Choose whether you want to Activate Recommended Features or Skip and explore features. We recommend to Skip and explore.
We suggest not enabling site accelerator as your images will be stored externally and require contacting Jetpack in order to remove any.