If you’re new to WordPress or just new to the Block system of it, you may not know exactly how the system works. It’s very different from most other websites but surprisingly easy to learn! Here’s how it works.
Continue reading “WordPress Article Tutorial: Choosing a Block”Category: WordPress
Adding SSL to WordPress
The best way to have your site HTTPS secure is do to it during install. However, if you hadn’t done that, follow this guide to set your WordPress site to HTTPS. If using ISPmanager, you’ll be able to set the automatic redirect which makes this process very easy.
Continue reading “Adding SSL to WordPress”Why blogs and articles shouldn’t be too long
If you’ve got a website or are planning on having one, you should know that creating content for it is one of your biggest jobs. You can’t just make an empty site and expect people to flock to it. People like to see things they haven’t seen before, read things they haven’t read before, and hear things they haven’t heard before.
If you want a successful website, you need to know how to create good content and one important part of that is to make sure your content isn’t too big.
Continue reading “Why blogs and articles shouldn’t be too long”How-to: Resize/Add Pictures on WordPress

Adding pictures to a WordPress website can be tricky if you don’t know the proper way to do it. With a little help though, you can not only add pictures to blogs but even add images that will display along with the blog called a “Featured Image”.
Continue reading “How-to: Resize/Add Pictures on WordPress”Making an Author Site with WordPress – Final Tips
This is the last article in our Making an Author Site with WordPress series. We hope it’s helped you get your WordPress author site ready and launched!
Continue reading “Making an Author Site with WordPress – Final Tips”
JetPack: Automatic Posting to Social Media with Publicize
Do you, like every other internet-using human in the world, use social media? Do you ever find yourself posting something neat on your website and wanting to share it with the world? Do you find it tiresome to then have to go from account to account copying and pasting over and over again? With Publicize on Jetpack, you and can do it all at once quickly and easily!
Continue reading “JetPack: Automatic Posting to Social Media with Publicize”Making an Author Site with WordPress – Getting Followers
This is the ninth article in our Making an Author Site with WordPress series. We’re almost done with this series and you should be well on your way to having your site done with some good content for your followers.
Continue reading “Making an Author Site with WordPress – Getting Followers”
WordPress: Enabling Jetpack Plugin Auto-Updates
Unless you’ve got the most basic of basic WordPress websites, you’ve likely got a few plugins. They’re nifty little things that’ll help a website run smoother or look better or work in the way you need it to work. Plugins are an absolutely fabulous tool to help make a site go from good to great, but the fact remains that they need upkeep.
Continue reading “WordPress: Enabling Jetpack Plugin Auto-Updates”Making an Author Site with WordPress – Adding Content
This is the eighth article in our Making an Author Site with WordPress series. We’re almost done with this series and you should be well on your way to having your site done.
Continue reading “Making an Author Site with WordPress – Adding Content”
WordPress: Jetpack Social Share Icons
Social share icons are simply exactly what they sound like — little buttons on a page that allow users to share content to other platforms. It’s a great little gadget that Jetpack helps you use and it’s easy enough to enable, too.
First, go to your Jetpack Dashboard. Next, in the top right of the screen you should see a “Settings” button. Click that and you’ll be taken to see all of Jetpack’s many features and settings you can change.
Near the top of the page once more you’ll find a long list of categories starting with “Performance” and ending with “Security”. Click the one labelled “Sharing”. Lastly, under the “sharing buttons” heading, enable “Add sharing buttons to your posts”.

Bingo-Bango, you’ve got buttons. Well, you’ve got them enabled, anyway. There’s actually a few more steps to decide which buttons you want enabled!
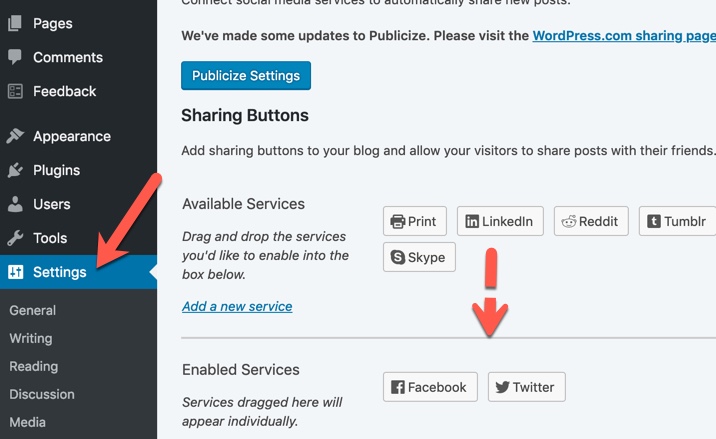
Get back to your main dashboard and now go to your WordPress Settings page on the left. Under it, click the Sharing tab. Simply drag and drop each sharing platform button you want enabled and you’re done!
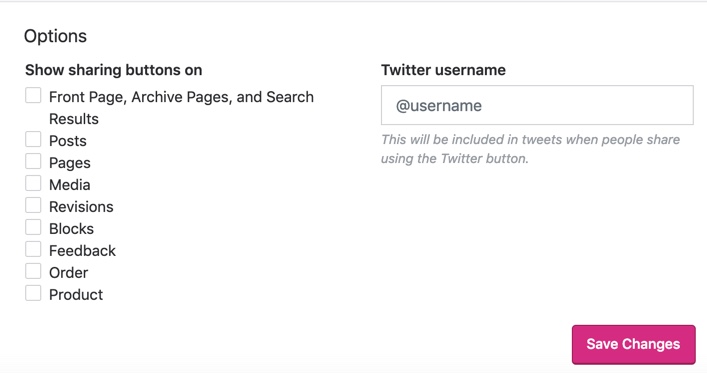
Note that you can also change your button styles and where they’re located at the bottom of that section by going to the Jetpack Dashboard and clicking “Configure your sharing buttons”. You’ll be taking to WordPress and will need to log in. Once there, you can change the enabled buttons and how they look.
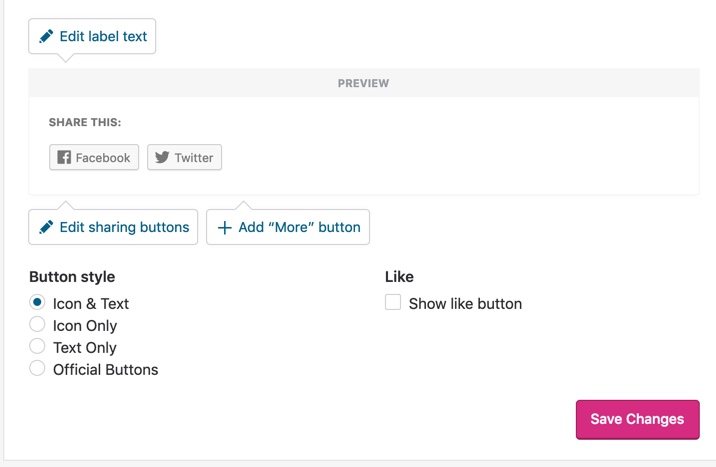
Below the customization options are options to choose which pages the buttons will appear on for your blog.